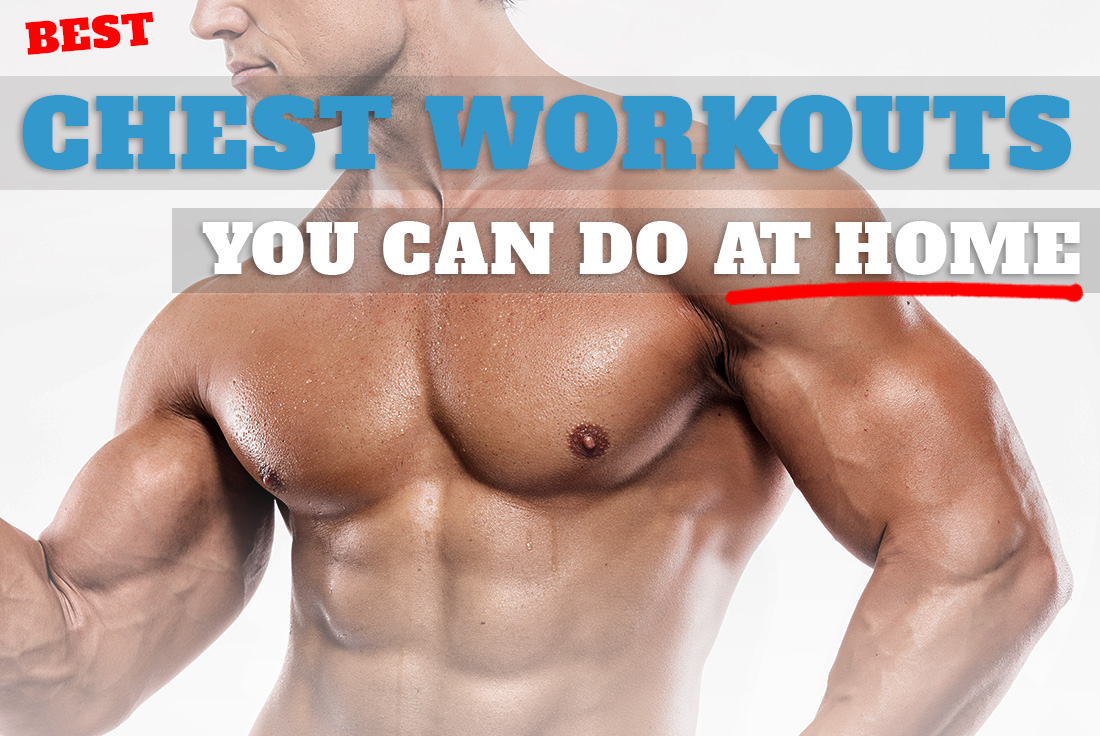
There’s no doubt that muscular chest muscles make men look more powerful and confident. I’m not necessarily talking about having a huge chest here, not at all.
Even slightly protruding pecs can project more confidence and stamina.
The good news is that you don’t need to go to the gym. You can build a powerful chest at your home with or without weights.
I’ll show you a home chest workout that work your upper, mid and lower pecs that you can do without any equipment.
If you do want to use dumbbells, I’ll also show you the most effective chest exercises that use dumbells, as well as other tricks you can use that are just as effective as weights, or you can even make your own dumbbells (more on this later).
You can get results and grow stronger pecs in just 10 minutes chest workout, assuming you pick the right exercises (that’s what we are here for) and put concentrated effort.
Strong chest muscles can improve back muscle strength, posture, upper body strength and your ability to push and pull large or heavy objects.
A solid chest workout, knowledge of the chest muscles and how to fuel your muscles are necessary to improve the strength of your pectoralis muscles.
If you want to train chest without leaving home, you are in for a treat. We’ve complied here all the resources you need.
(I suggest you bookmark this page so you can also use it a reference)
Tip! Even if you think you have most things already figured out, I highly suggest you read this guide chronologically. You can find a lot of gems here (you won’t regret it!)
Chest Anatomy (In 30 Seconds)
You don’t need to be an expert so we’ll just explain real quick the gist of the chest muscles. This helps to know in what movement your chest muscles are being used.
So there are two main muscles in your chest, the pectoralis major and pectoralis minor, but many just refer to them as pectorals or “pecs” for short.
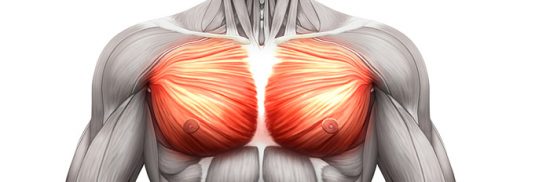
Pectoralis Major
The pectoralis major is a thick fan-shaped muscle that consists of sternal (breastbone) and clavicular (collarbone) attachments. It lies across your chest.
This muscle contributes to several actions:
- Flex your arm at your shoulder joint
- From a flexed position, it extends your arm at your shoulder joint
- Medial rotation of your arm at the shoulder joint
- Adduct your arm at the shoulder joint
Pectoralis Minor
The pectoralis minor lies below your pectoralis major muscle. This muscle starts from the third to fifth ribs and inserts into the scapula’s (shoulder blade) coracoid process (the hook-like structure on your shoulder blade).
This muscle contributes, along with other muscles, to the depression, protraction, downward rotation, stabilization, abduction and upward tilt of your shoulder blade.
We know that you are excited to see the chest exercises that we recommend for your home chest workout.
But before showing you what to do, equally important we want to show you what not to do.
3 Mistakes You Should Avoid (If You Want A Big Chest)
Before we show you the exercises and how to work your chest, let us look at what you should not do. You often hear about how you should work out, but you rarely do you hear about what you should avoid.
You are here because you want a stronger and more muscular chest. So you want to do the most effective and efficient exercises for your chest.
Mistake 1 – Doing Fancy Stuff
There is way too much misinformation out there regarding chest exercises that are either overly sophisticated or just plain awkward. The truth is that to build chest muscle strength and mass, you want to focus on basic chest exercises. In most cases, you want to avoid complicated movements as these tend to put less attention on your pectorals and more emphasis on assisting muscles.
I will try to keep it basic here, but basic in a good way. These exercises are great for beginners, but they are as effective for the seasoned fitness enthusiast as they are for the novice.
In fact, if you have been working out for a long time, you may have fallen into the trap of sophistication in favor of results. In that case, this article can be a good refresher for some effective and practical chest exercises you can do at home or at the gym.
We refer to these exercises as “basic” to mean that they simply get the job done without fancy equipment or moves.
These exercises will help you to improve your strength. You can also use them to increase your chest muscle mass by adding resistance and eating a diet that promotes muscle growth.
Mistake 2 – Doing Exercises That Exhaust Your Deltoids & Triceps Before Your Pecs Do
Some chest exercises put too much emphasis on secondary muscles, causing you to exhaust these muscles before your pecs. This can result in your pectorals not getting a sufficient workout.
The best example I can think of is the triceps. Most chest exercises hit the triceps to some extent, some more, some less, that’s ok cause that’s just the way the human body works, you cannot truly isolate your chest muscles without hitting any other muscle.
But if you do a set which hits your triceps too much, your triceps fail before your chest muscles do, leaving your chest with plenty of more power. So your chest muscles are not getting the full benefits of your chest workout. You want to exhaust your chest muscles before your deltoid and tricep muscles.
You can work out your shoulders at home after chest or on a different day
Your deltoids or triceps may get fatigued before their chest if you work at an angle in which your arms are positioned more towards your head, or using a grip that is too narrow. This is even more apparent for guys with long arms, in such case slightly changing the angle will relieve stress from triceps, and place more focus on the pecs.
Not all chest or “push-up” exercises are created equal, and many might leave your chest with enough strength to do more reps if only other “assisting” muscles weren’t giving up on your before your chest did.
When you are working on your chest, you want exercises that target your pecs as the target muscles. Secondary muscles will surely work as well, but you want to leave them with enough strength so they will assist in the movement and not fail before your chest does.
Here you will get a list of exercises that focus on your pectoralis major and pectoralis minor muscles first. They will still target different secondary muscles, such as your triceps and deltoids, and various muscles in your back and core, but to a lesser extent.
It is important to remember that just because an exercise appears to target the chest, this does not mean that the pecs are the primary target.
The Close-Grip Bench Press is an excellent example, it’s an exercise that is good for your triceps but poor for your chest. The closer your grip in the bench press the more your tricep work, but we will cover this exercise when we discuss home workouts for your triceps.
Mistake 3 – Too Many Advanced Chest Exercises
Certain chest exercises are more advanced than others, but this does not mean that a routine with only advanced exercises is necessarily better.
No matter your fitness level, going back to the basics, with some advanced moves in between once you improve your strength, is an ideal combination for a stronger chest with a more powerful look.
Certain chest exercises are time-tested. They look simple and are not complicated to perform. This makes them an excellent choice for beginners and advanced guys alike. It ultimately comes down to the weight that you are using (using your bodyweight solely or adding resistance).
Three Types Of Chest Exercises
It doesn’t matter if you have weights or not. We are going to cover here three kind of chest exercises you can do at home.
BODYWEIGHT CHEST EXERCISES – You don’t need anything buy yourself for doing this chest workout. The beauty of it is that you can do it anywhere, whether at home, at an hotel and of course also at the gym. Don’t underestimate the power of bodyweight exercises.
USING EQUIPMENT – We’ll show you great exercises you can do at home using dumbbells. You can also use DIY and improvised weights if you don’t have dumbbells.
CHEST EXERCISES WITH RESISTANCE BANDS – There are some very effective exercises for your pecs that you can do at home using nothing but resistance bands. I just love resistance bands because they are versatile yet so cheap. I take my resistance bands kit everywhere. It’s like having a mobile gym.
Powerful Looking Torso
Men with developed chest muscles project a powerful torso, however, to complete the picture don’t neglect your biceps and forearms. You can build impressive biceps at home as well as Popeye-like forearms.
Developed arms don’t just look good, but they also assist you in chest and back exercises.
Last but not least, don’t neglect working out your back. The most effective bodyweight exercises for building a broad looking back and a nice v-shaped body are pull-ups and chin-ups. If you don’t have a pull-up bar you can make one yourself.
Bodyweight Chest Exercises
Exercises & Topics Covered
- Push Ups
- Wide Grip Push_Ups
- Decline Push_Ups
- Narrow Grip Push_Ups
- Chest Dips
- Archer Push_Ups
- Diamond Push_Ups
- Isometric Chest Press
- Total Chest Workout Plan (5 Minutes Video)
- 5 Tips to Intensify Your Bodyweight Workouts
Push Ups
A traditional push-up focuses on your pecs. If a standard push-up is too difficult, there are variations that beginners can start with.
HOW TO DO
- Get on the floor on your hands and knees
- Stretch your legs out behind you until you are balancing on your toes
- Place your hands slightly more than shoulder-width apart
- Lower your body until your elbows are at 90 degrees
- Push yourself back into the starting position
TIPS
- Do not flare your elbows since this stresses your shoulders and elbows.
- Do not flare your elbows since this stresses your shoulders and elbows.
- Your torso and elbows should be perpendicular to each other.
- Keep your hands parallel with your body. If they point inward, this causes your elbows to flare.
- Make sure that your elbows are pointing backward.
- Keep your arms close to your body to prevent them from pointing sideways.
- Use a slightly wider grip in order to focus more on your pecs and less on your triceps.
VARIATIONS
- Kneeling Push-Up: If you cannot do a traditional push-up yet, you can balance your lower body on your knees instead of your toes. The other steps are the same.
- Push-Down Only: The most challenging part of a push-up is pushing back up after you lower your body. If you cannot complete a full push-up yet, just lower your body for each repetition until you gain enough strength to do the full push-up.
Wide Grip Push-ups
This type of push-up puts more focus on your chest muscles than any other type of push-up.
While this type of push-up does reduce your range of motion, it gives you some variation in your workout.
This type of push-up also removes some stress from your triceps to better target your chest muscles.
HOW TO DO
- Start in plank position
- Keep your feet together
- Place your hands wider than shoulder-width
- Point your fingers slightly outward or forward
- Lower your torso by bending your elbows out to the sides
- Once your chest gets below the height of your elbows, pause your movement
- Push your body up into the starting position
TIPS
- Do not sag your lower back or hips.
- Do not let your back cave in when in the high plank position
- Keep your neck neutral and do not lift your head or tuck your chin
Decline Push-ups
This type of push-up is an advanced variation of a traditional push-up.
Since your feet are above your hands, it increases the difficulty. You can use a stair to elevate your legs.
While this push-up targets your chest muscles (specifically your pectoralis major), it also works your shoulders, arms and back as secondary muscles.
HOW TO DO
- Get onto your hands and knees
- Place your hands about shoulder-width apart
- Move your feet onto the stairs or onto the object you are using to elevate them
- Align your body so that it is a straight line
- Bend your elbows to lower your body
- Look up slightly to allow for a full range of motion
- Lower your body to just above the ground
- Push your body up into the starting position
TIPS
- Do not lock your elbows when you are in the starting position.
- Do not arch your back when you lift your head since this can strain your back muscles.
- Do not place your hands too wide as this restricts your range of motion
Narrow Grip Push-ups
This push-up works your chest muscles, but it works your triceps muscles. You also work your core, back and shoulders with this push-up.
The more you narrow your grip the more focus is placed on your inner chest.
HOW TO DO
- Get onto your hands and knees on the floor
- Get onto your hands and knees on the floor
- Extend your legs out behind your body slightly wider than hip-width apart
- Lower your torso until it is about one inch from the floor
- Keep your elbows right beside your body
- Push your body back into the starting position
TIPS
- Be careful not to sag your hips or arch your back as this puts stress on these areas of the body.
- Do not make your grip too narrow as this can stress your elbows.
- The narrower your grip, the greater range of motion to work more muscle fibers.
Chest Dips
This is a great exercise that activates the pectorals and additional muscles act as stabilizing muscles.
Chest dips place more emphasis on the outer chest muscles and help you to gain better control over your bodyweight. This can help you when you perform other chest exercises, such as wide grip push-ups.
Any two surfaces that are level and stable can work instead of chairs.
If you have a shoulder injury or pain, avoid this exercise until you heal completely. This exercise puts a lot of stress on your shoulders. You can use two chairs for this exercise.
HOW TO DO
- Place one hand on each chair or surface
- Lean forward
- Keep your elbows slightly more than shoulder-width apart
- Bend your knees at about 90 degrees to lift your feet off of the ground
- Lower your body until your shoulders and elbows are parallel
- Lift your body back into the starting position
TIPS
- Do not bounce or swing during this exercise because this could cause you to fall.
- Do not lock your elbows at the top.
- Avoid letting your shoulders move forward as you lower your body.
- You can use two chairs however it might be slightly less comfortable as your body is not high enough and you may find it difficult to keep your legs from hitting the floor.
Archer Push-ups (Side-to-side Push-ups)
If your goal is to do a single-arm push-up, start with archer push-ups. This exercise is an assisted version that allows you to work your chest muscles enough to handle a single-arm push-up.
HOW TO DO
- Get into traditional push-up position on the floor
- Point the fingers of one arm forward and put this hand under the shoulder on the same side
- Place the opposite arm out to the side and rest it on the floor
- Keep the elbow under your shoulder next to your body
- Using the arm below your shoulder, push your body up
- Lower your body into the starting position
TIP
- To make this push-up easier, bring the hand you use to stabilize your body closer to your body instead of straight out to the side.
Diamond Push-ups
This exercise allows for a strong contraction of your pectoralis muscles. Since this exercise also strongly engages your triceps, we recommend that you wait to perform it until the end of your chest workout.
HOW TO DO
- Get onto the floor on all fours
- Below your chest, put your hands together
- Your thumbs and index fingers should touch to form a diamond shape
- Keep your elbows at your side and maintain the diamond as you lower your body to the floor
- Push up into the starting position just before your chest touches the floor
VARIATION
- If you cannot perform this push-up with the traditional form, balance on your knees instead of your toes.
Isometric Chest Press
This is an easy exercise that focuses on your chest, but it also works your biceps.
HOW TO DO
- Sit or stand with your elbows at a 90-degree angle
- Put your palms together out in front of your chest
- Push your hands against one another
- Slowly increase the level of tension
- Once you reach the recommended number of seconds, slowly release the tension
Total Chest Workout For Home – 5 Minutes Video
It may be overwhelming after learning about how many exercises you can do for your chest.
The following video presents five exercises that you can do at home. These exercises target all of your chest muscles, including those in your mid, lower and upper chest.
Mid-Chest
- Wide Grip Push-Ups -10 to 20 reps
Tip: slow down your repetitions if this is too easy for you. To add some weight, wear a backpack filled with books - Chest Flys -10 to 20 reps
Use a water bottle for weight. To make homemade weights, fill milk jugs with sand
Upper Chest
3 Upper Chest Raised Leg Push-Ups – 10 to 20 reps
This exercise is similar to an incline chest press
4 Reverse Grip Push-Up – 10 to 20 reps
To reduce stress on your shoulders, keep your feet shoulder-width apart
Upper and Inner Chest
5 Reverse Grip Front Raises – 10 to 20 reps
Make this exercise more challenging with improvised weights or water bottles
Here are two example chest workouts you can alternate between to stimulate chest muscle growth and to prevent exercise boredom.
There are no strict rules regarding which exercise plan you choose.
You can even create one of your own. What is important is that you stick with your plan for at least 30 days before switching.
Here are two workout plans, you can try the first for a month and then switch to the second or vise versa.
WORKOUT PLAN 1
This workout routine covers only bodyweight exercises and it is aimed at beginners. Initially, perform the following:
- Push-Ups – 10 repetitions
- Wide Grip Push-Ups – 10 repetitions
- Chest Dips – 10 repetitions
- Isometric Chest Press – 10 repetitions
Once you are comfortable doing 10 repetitions of each of these exercises, add 10 repetitions each of diamond push-ups, archer push-ups, decline push-ups, and narrow grip push-ups. This has you doing eight exercises that all target your chest before increasing your repetitions.
As you increase your strength, add a second set of repetitions. For example, instead of one set of 10 repetitions, you will do two sets of 10 repetitions. Once two sets of 10 are easy, do two sets of 20 repetitions. Once you get too comfortable with this, you can look at the second example which adds weights, making it more challenging than bodyweight alone.
You can increase your repetitions every 15 to 30 days, depending on how your strength is developing.
WORKOUT PLAN 2
Once you perform the bodyweight routine above for 30 to 60 days, consider going to this routine. All of these exercises use weights. You can use water bottles or improvised weights, or you can use dumbbells. Start with 10 to 15 pounds of weight, depending on your strength.
Initially, perform the following:
- Dumbbell Chest Press No Bench – 12 repetitions
- Dumbbell Chest Flys – 12 repetitions
- Weighted Push-Ups – 12 repetitions (put 10 to 15 pounds in a backpack for this exercise)
After 15 days of this routine, add the following:
- Incline Dumbbell Presses No Bench – 12 repetitions
- Decline Dumbbell Presses – 12 repetitions
After an additional 15 days, perform all five exercises for each workout. Increase the weight by five pounds if you are ready for more weight. Add three repetitions to each exercise, for 15 repetitions each.
After 30 days, add five more pounds if your current weight is comfortable. You can also increase to two sets of 15 repetitions per exercise to make the workout more challenging.
For both examples, give yourself 48 to 72 hours in between chest workouts. For example, perform your chest workout every Monday and Thursday. This allows for adequate rest. You can work other parts of your body on the days you are not doing your chest workouts.
A FEW WORDS ABOUT REPETITION RANGE
You don’t have to be strict with the number of reps you do for each set. The range of reps that we mention is typically 10 to 20. However, it’s good to spice things up from time to time to confuse your muscles and stimulate growth.
For example, you can go as low as 8 reps, though if it’s too easy you will need to add resistance in some form (weights, resistance bands, improved dumbbells etc…). Or if an exercise is easy for you, you can go for higher reps like 25 or even 30.
Your body doesn’t understand reps, what your body understands is time under tension.
In most cases, the sweet spot tends to be between 10-20 reps, especially for bodyweight exercises.You don’t have to be strict with the number of reps you do for each set. The range of reps that we mention is typically 10 to 20. However, it’s good to spice things up from time to time to confuse your muscles and stimulate growth.
For example, you can go as low as 8 reps, though if it’s too easy you will need to add resistance in some form (weights, resistance bands, improved dumbbells etc…). Or if an exercise is easy for you, you can go for higher reps like 25 or even 30.
Your body doesn’t understand reps, what your body understands is time under tension.
In most cases, the sweet spot tends to be between 10-20 reps, especially for bodyweight exercises.
5 Tips To Intensify Your Workout
- Change your angle to further challenge your body. Your mechanical advantage decreases when your feet become higher than your head, making the exercise harder.
- Change your tempo for a harder workout. For example, hold your push-up for one or two counts instead of three to four. Performing the exercises faster keeps your muscles under tension longer.
- Increase your range of motion during each exercise. At the end of the range of motion, muscles are weakest. This means that you can build more strength by pushing them to the extent of their range of motion.
- Perform exercises in a destabilized fashion. For example, lift one leg toward the ceiling when you perform a push-up. This makes the exercise harder so that you improve your strength in less time.
- Incorporate plyometrics into your exercises. For example, when you perform a push-up, as you push your body up, push yourself off the ground and clap your hands before landing and going back down into your next repetition. Research into plyometrics suggests that it could increase strength.
Chest Exercises With Weights
Exercises & Topics Covered
- Weighted Push_Ups
- Dumbbell Chest Floor Presses (No Bench)
- Dumbbell Chest Press With Bench
- Incline Dumbbell Press (No Bench)
- Decline Dumbbell Press
- Dumbbell Chest Flys
If you bodyweight exercises become too easy for you, you can add some weights to add more resistance. I recommend getting adjustable dumbbells though homemade dumbbells are fine too.
Weighted Push-ups
Push-ups target your pecs as long as you use proper form. There are also different variations that you can do so you can reap the benefits of push-ups no matter your fitness level.
HOW TO DO
- Put on your weighted backpack so that it is sitting toward your lower back.
- Get into a push-up position with your legs straight out and your hands slightly wider than your shoulders.
- If you are using a plate, have someone place the place on your lower back. Near your hips.
- Lower yourself until your elbows are at a 90-degree angle.
- Push yourself back up into position.
TIPS
- Experiment with how wide apart your feet are to see what is most comfortable for you.
- Make sure that your backpack straps are taut so that it is not sliding around as you move.
- If you use a plate, have someone spot you so that they can make sure it does not slip off your back.
- To keep your body in a straight line during push-ups, tighten your abs and clench your buttocks. This engages your core so that your body remains in a straight line.
- Do not look directly down at the ground. Look slightly ahead of you to keep your body in a straight line.
VARIATIONS
- Lower Phase Push-Up: Just performing the lowering phase of a push-up lets you increase your strength until you can perform a full push-up.
- Kneeling Push-Up: Instead of balancing your lower body on your toes, you are balancing with your knees. The rest of the exercise is the same.
Dumbbell Chest Floor Presses Without A Bench
All you need for this exercise is a set of dumbbells. You can also use improvised dumbbells (such as these) or water bottles. While your range of motion is limited without a bench since the weights will not go to chest level, this exercise still provides a workout for your chest.
HOW TO DO
- Lie on the floor on your back
- Place your hands next to each shoulder
- Hold a dumbbell in each hand
- Bend your knees until they are facing the ceiling
- Push the dumbbells toward the ceiling
- Hold the position and then lower into the starting position
Dumbbell Chest Press With A Bench
This is exactly like a dumbbell chest press on the floor. However, when you are lying on a bench, you can lower your elbows more, giving you a greater range of motion. This stretches your pectorals muscles more effectively.
HOW TO DO
- Lie on your back on the bench
- Hold a dumbbell in each hand
- Rest the dumbbells on your thighs
- Pull the dumbbells to the sides of your chest
- Bend your elbows at 90 degrees
- Push the dumbbells up using your chest muscles
- Lower the dumbbells into the starting position
TIP
- When you finish your repetitions, do not drop the weights at your side. This puts you at risk for a rotator cuff injury.
VARIATIONS
- In the traditional version, your palms face away from your body. One variation is to start with your palms facing each other. Then, as you lift the dumbbells, twist your wrist so that they face away from your body once the dumbbells are raised fully.
If you bodyweight exercises become too easy for you, you can add some weights to add more resistance.
Incline Dumbbell Press Without A Bench
Compared to a flat bench, using an incline lets you target your upper pectorals. You can use an exercise ball to elevate your upper body if you do not have a bench.
You can do this exercise on the floor, but this stops you from lowering the dumbbells to your chest level.
HOW TO DO
- Sit on the ball with your feet on the floor
- Hold a dumbbell in each hand
- Walk forward with your back straight to lower your hips
- Once your lower back is on the ball, stop walking forward
- Your head and shoulders should not touch the ball
- Your head and shoulders should not touch the ball
- Bend your elbows at 90 degrees
- Push the dumbbells up and together
- At the top of the movement, the dumbbells should almost touch. Then lower the weights into the starting position
TIPS
- Choose a ball that lets you keep your hips and knees at the same height.
- Do not move your torso above 45 degrees. A higher angle takes away emphasis from your chest and forces you to put more focus on your deltoids.
Decline Dumbbell Press
This exercise focuses on your chest. It also engages your upper arms as secondary muscles.
HOW TO DO
- Lie on a decline bench
- Use an overhand grip to hold the dumbbells
- Keep your hands shoulder-width apart
- Push your arms directly above you
- Lower the weights to your chest
- Move the dumbbells back into the starting position
Dumbbell Chest Flys
You can perform this exercise with or without a bench. Using a bench increases your range of motion for a better stretch of your pectorals. This exercise both stretches and strengthens your chest muscles.
HOW TO DO
- Lie on your back
- Hold a dumbbell in each hand with your palms facing in
- Lift the dumbbells over your chest
- Push them up until they are above the center of your chest
- Lower both arms to your sides
- Pull the dumbbells back together over your chest
TIPS
- Do not arch your lower back and engage your core as you lower your dumbbells.
Chest Exercises With Resistance Bands
Exercises & Topics Covered
- Chest Press with Resistance Bands
- Incline Chest Press with Resistance Bands
- Chest Fly Cross Over with Resistance Bands
- Decline Push_Up with Resistance Bands
- Tips for an Effective Resistance Bands Chest Workout
The first tool that I recommend to anyone exercising at home to buy are resistance bands. They are cheap, very easy to use and an extremely effective way to get a total body workout at home or wherever you want.
I’ll mention briefly the top 3 advantages of working out with resistance bands.
- They are adaptable for several fitness levels and are available in a variety of resistances. You can adjust the resistance quickly by giving less slack to the band.
- Resistance bands add variety to your workouts. When you perform the same exercises repeatedly, your muscles start to adapt. These bands can help you to keep challenging your muscles for a more effective workout.
- They can provide assistance during difficult exercises. For example, you can use the bands to help support your weight to make challenging exercises slightly easier until you get stronger and no longer need to use the bands.
If you bodyweight exercises become too easy for you, you can add some weights to add more resistance.
Chest Press With Resistance Bands
This exercise focuses on your chest, but it also engages your arms and shoulders. It also helps your body to learn how to engage your core to improve stabilization.
HOW TO DO
- Put your right foot on the band’s center
- Pull the handles or ends of the band to your shoulders
- Keep your palms facing forward
- Keep your elbows slightly behind your body
- Press your arms out in front of your body
- Slowly pull your elbows back
Incline Chest Press With Resistance Bands
This exercise targets the upper pectoralis muscles. Attach your resistance band to a door handle for this exercise.
HOW TO DO
- Stand with one foot about six inches in front of the other
- Pull the band from behind you
- Hold the ends of the band in each hand
- Lean forward slightly
- Bend your elbows at 90 degrees
- Push both arms forward until they are straight out, but at a 40-degree elevation
- Slowly pull your elbows back
TIP
- To make this exercise more challenging, step further forward. You can make it easier by moving closer to where you attach the band.
Chest Fly Cross Over With Resistance Bands
This exercise lets you work against a resistance point which better isolates your chest muscles. Anchor your resistance bands to a door handle.
HOW TO DO
- Hold one end of the band in each hand
- Stand approximately three feet from the door
- Straighten your head, back and chest
- Pull the band out and around
- Your arms should be in front of your body with one hand above the other
- Alternate which hand goes on top of the other with each repetition
TIP
- Throughout the movement, maintain a slight bend in your elbows to allow for a more fluid movement.
Decline Push-up With Resistance Bands
This exercise provides the chest muscle benefits of a traditional push-up, but it increases the challenge. This is due to your legs being elevated and the resistance band around your back making it harder to push your weight up.
HOW TO DO
- Lie on the floor in standard push-up position
- Place your feet on the seat of a chair
- Place the resistance band across your mid-back
- Hold each end of the band so that there is no slack across your back
- Push off the floor until your arms are straight
- Return to the starting position
TIPS
- When you are lowering your body, stop once your upper arms are parallel to the floor.
- Make sure that your buttocks do not sag or push up during this exercise
Tips For Chest Workouts Using Resistance Bands
If you use resistance bands with handles, firmly grip each handle in each hand. If you are using resistance bands without handles, wrap the ends of the band around each hand.
If you are a beginner, it is best to start with a basic band. As you build strength, move onto a tube style for more variety of higher levels of tension.
The further you stretch the bands; the more tension occurs. The approximate length that works for more people is a band or tube that is five feet long. The closer your hands are together, the greater the resistance. You may start with your hands spread further apart, moving them closer to each other as you build strength.
General Tips For Good Chest Workouts
Whether you have a home gym, or you are starting out with no equipment, you can get a great chest workout at home.
Here are some universal tips, I find may find useful for every workout, whether at home or at a gym.
- Use lightweight to warm up for about 10 minutes before your chest workout. Warming up is important to reduce the risk of injury. It benefits your muscles, ligaments and tendons by ensuring that they have adequate blood flow.
- Do not stretch your chest muscles until after your warmup. Hold each stretch for approximately 20 to 30 seconds and keep them light. You can also perform gentle stretches for a 10 minute cooldown.
- Start with light weights no matter your experience level. When you start a new exercise, you need to see what you can safely and comfortably handle. As you improve your strength, increase your weight.
- Make sure that you are using the proper form. Improper form can lead to injuries.
- One side of your chest may be stronger than the other. Isolate each side of your body to ensure that you work both sides equally.
Recommended Equipment For At-home Chest Workouts
If you have gotten this far, you know that it is possible to get an excellent chest workout at home without equipment or weights.
Here are some additional suggestions that can help to make your workouts more convenient, and in some cases, more efficient:
- Weight Bench – While not a necessity, if you want to supercharge your chest workouts, a compact workout bench is the best piece of equipment to get. It allows for better range of motion when you are doing exercises that require you to lay on your back. Your elbows can go slightly past the level of your chest for greater stretching. Besides, there are many exercises you can do with a workout bench to get a full body workout.
- Push-Up Grips – These are not a necessity either, but they can add intensity to your push-ups and reduce some strain on your wrists. These grips also offer a better range of motion when you do push-ups.
- Adjustable Dumbbells – We mentioned earlier how you can make your own dumbbells or even use household items, such as backpacks and water bottles. However, using adjustable dumbbells, you can quickly change the weight between exercises and sets. For example, the Bowflex SelectTech adjustable dumbbells allow you to have a range of 5 to 52.5 lb in one pair, essentially giving you 15 pairs of dumbbells in just one pair.
- Resistance Bands – We discussed these above and provided some exercise options for working your chest using inexpensive resistance bands. They come in a variety of resistance strengths, and you can add several resistance bands together to get such a resistance that is similar to 50 pounds of dumbbell or more. Resistance bands are perhaps the single most versatile training tool (and it’s cheap too) that you can use to workout every muscle group.
How Often You Should Work Your Chest
It is a common misconception that the more exercises and more sets you do for your chest the better.
For one, overly fatiguing your muscles can lead to overtraining. And just as important, your muscles actually need some time to recover before you put them through another workout.
When you train your chest muscles, tiny tears develop in the tissue, these tears do not hurt you, yet they are imperative for muscle growth. When tears knit up, your muscles grow stronger as your body’s natural mechanism is to make recovered muscles stronger and bigger so they can take more load the next time.
You may feel pain in your pecs that begins 24 hours after the workout and peaks at 48 hours. This kind of pain is called DOMS (Delayed Onset of Muscle Soreness). You can still train if you have DOMS, but should take it easy in order to allow your body to repair your pecs.
Ideally, you want to take 48 to 72 hours to rest in between your chest workouts. For example, if you work your chest on Monday, do not work it again until Thursday or Friday. This allows enough time for the knitting to occur after your workout causes the tiny muscle tears.
So I would say 2-3 times a week is plenty for working out your chest. On the days you are not working chest, you can target other muscles. We wrote some excellent guides on biceps home workouts and ways to exercise your delts at home. And one of my favorite bodyweight-only exercise is the burpee which you can add following your chest workouts or just do it on the other days.
Feed Your Pecs If You Want Them To Grow
If your diet is not contributing to the growth and health of your chest muscles, you are not getting the full benefit from your workouts. The saying, “you are what you eat” is absolutely true when it comes to strength training and muscle building.
Protein, carbohydrates and fats all play a role in muscle development and health. The key is balancing these nutrients and getting enough without going overboard.
The general recommendation for protein is that this nutrient should account for 10 to 35 percent of your total daily calories. Research has not found any benefit in eating more protein than this. This recommendation is for when you are working on building your chest muscles.
Carbohydrates are nutrient that fuels your muscles during your workouts. When you consume carbs, they are partially converted into glycogen. Your muscles store glycogen so that it is available to fuel your workouts. Focus on complex carbohydrates, such as whole grains, vegetables, fruits and legumes.
When you are strength training approximately twice a week, about 45 to 64 percent of your daily calories should come from carbohydrates. When your body has enough carbs, this helps to spare your body’s protein reserves to promote muscle maintenance, growth and repair.
Fat is essential because your body uses it to fuel your muscles with energy during your workouts. The general recommendation is for fats to make up 25 to 35 percent of your day’s calories. The key is to choose the right fats:
Omega-3 Fats – Food such as fatty fish, eggs, flaxseed, eggs and walnuts.
Monounsaturated Fats – Olive and avocado oils, peanut butter, avocados and nuts.
What’s Next?
Consider this your complete guide to working toward a stronger and more powerful chest. There are many options here, allowing you to customize your chest workout in the way that best suits your needs and preferences. All that is left is to get off the couch and get started.
Powerfully looking chest goes hand in hand with strong and visually impressive arms. You can get grow those biceps at home without using any weights (find out here).
Muscular deltoids will make you seem wider as well as protect you from injuries. To develop a powerfully looking (and strong!) upper body, don’t ignore your delts. Just as with any muscle group, you can get a good delt workout at home.
Another super exercise that doesn’t require anything but your body is the burpee, so I strongly recommend you check out our burpee guide which shown you how to get the best out of this super exercise. You can do burpees at the end of your chest workout or on other days.


Leave a Reply